| |
Welcome
to the very beginning of Photoshop, from this page you
will gain an understanding of the selection, move, crop
and slice tools.
Of all the tools in Photoshop, the selection tools will
be one set that you use constantly, so proficience with
them is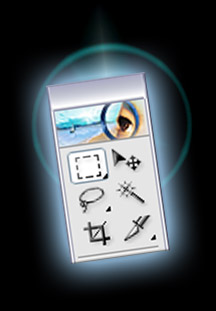 very important. As with all the tools in the toolbar,
if you hold down on tool sets with a black lower right
corner, more tools will emerge that have a similar related
or opposite function. In the upper left corner of the
toolbar is the Reqtangular Marquee Tool, and underneath
that is the Ellipitcal, Single Row, and Single Column
tools. At any time you can press the M key alone and the
visible Marquee tool will be selected. You can switch
between your most used tools quickly when you use their
hotkey, and if you hold the mouse over the toolbar, it
will tell you if there is a hotkey for any given tool.
There are a few other handy keys to remember when working
with the selection tools, so I'll make a list:
very important. As with all the tools in the toolbar,
if you hold down on tool sets with a black lower right
corner, more tools will emerge that have a similar related
or opposite function. In the upper left corner of the
toolbar is the Reqtangular Marquee Tool, and underneath
that is the Ellipitcal, Single Row, and Single Column
tools. At any time you can press the M key alone and the
visible Marquee tool will be selected. You can switch
between your most used tools quickly when you use their
hotkey, and if you hold the mouse over the toolbar, it
will tell you if there is a hotkey for any given tool.
There are a few other handy keys to remember when working
with the selection tools, so I'll make a list:
-
M, selects the visible Marquee tool.
-
Ctrl-A, will select your entire image
-
Ctrl-D, will deselect or turn off the selection
-
Shift, will allow you to add to a selection
-
Alt, will subtract from a selection.
-
Space bar, will allow you to move the image around
with the hand
Ok,
lets practice with the selection tool some, make a new
image, or open one you have, and use the rectangular Marquee
to select part of it... then hold down shift and make
a few more boxes, they can either touch the first or not
overlap. This is adding to your selected area, and you'll
notice that with shift down, there's a plus sign next
to your cursor. If you switch from the shift key and hold
down the Alt key instead you will that you're now subtracting
things with each box or oval you make. You can also use
the Shift and Alt keys with the lasso and magic wand tools.
I rarely use the 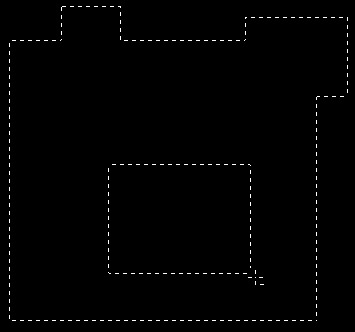 single
column or sigle row selecton tools... they select a one
pixil line, which can be usefully if you want to make
a border around an image. The lasso tools, normal, polygonal
and magnetic follow the same rules the Shift and Alt keys
for adding and subtracting. The regular lasso is free-flowing
and whatever you draw around will get selected. The polygonal
lasso will follow a straight line and to make it complete
the selection you must connect the end point back to the
point where you started. The magnetic lasso acts as the
normal lasso, but will magnetically attract to areas of
color change. If you have a dark image on a light background
you can use this tool to select the object and it will
automatically stick around the object being cut out, even
if you stray and get a little off. The Magic wand in the
final selection tool, with it you can click on any give
color, and it will select it. You can adjust the tollerance
of the wand at the top of the screen under the menu bar.
Changing the tolerance allows you to tell the wand how
picky to be when its selecting a color. A low number will
not accept much varriance, while I high number will select
more. 32 is usually the default setting. single
column or sigle row selecton tools... they select a one
pixil line, which can be usefully if you want to make
a border around an image. The lasso tools, normal, polygonal
and magnetic follow the same rules the Shift and Alt keys
for adding and subtracting. The regular lasso is free-flowing
and whatever you draw around will get selected. The polygonal
lasso will follow a straight line and to make it complete
the selection you must connect the end point back to the
point where you started. The magnetic lasso acts as the
normal lasso, but will magnetically attract to areas of
color change. If you have a dark image on a light background
you can use this tool to select the object and it will
automatically stick around the object being cut out, even
if you stray and get a little off. The Magic wand in the
final selection tool, with it you can click on any give
color, and it will select it. You can adjust the tollerance
of the wand at the top of the screen under the menu bar.
Changing the tolerance allows you to tell the wand how
picky to be when its selecting a color. A low number will
not accept much varriance, while I high number will select
more. 32 is usually the default setting.
The
Move tool is a fairly simple thing. Once you've made a
selction switch to the move tool (V key) and you'll be
able to move your selection or layer (and I'll cover those
later) around. If you do not switch to the move tool,
and use one of the selection tools it will move the selection,
but not the selected area.
The
Crop tool (C) is also fairly simple to use. Use it to
drag a selection, you can resize the area by pulling the
boxes at the sides and corners of the selection, and then
double click inside the crop area, and it will cut your
image to be the size of the selection. When you pick up
the crop tool at the top of the screen you can set a fixed
crop size, so if you need to make your finished image
exactly 400 by 400 pixils, this is a handy feature. Make
sure that you type in "400px" though if you've
been working in inches, and just type in 400 it may by
default put in an "in" after your 400. You probably
won't come to realize that you've done this, until you
begin to wonder why it's taking so long for your computer
to finish cropping the image. The reason it's taking so
long would be because it's blowing the image up to a huge
size. Also on the top bar will be the cancel or accept
crop. Sometimes with some images if you're making it very
small... it's difficult to find an area inside it to double
click, so you can hit the accept button (the checkmark)
to accomplish this.
The
Slice tool is relatively new to Photoshop. Did you know
Photoshop could take your images and convert t hem
into a website? It will make tables and write all the
code for you. It's great for the formative stages of web
design when you need to make a template page to get the
look down for your site. In the future I'll have a project
tutorial on making a website but for now I'l breifly describe
it. Make a new image or open one, grab the slice tool,
and then drag a box like I have in the image to the right.
You'll notice it numbered the boxes one threw three. Now
go to File/Save for web... You can chose to save your
images as Gifs, Jpgs, or Pngs. When you click save make
sure you open up the Save as type, and tell it to save
both the HTML and images, and save it to your desktop.
Photoshop then cuts up the image into three separate (or
however many parts you sliced it into), and then it creates
a webpage in HTML, makes the table and insterts the images
seamlessly so it all fits together when you open the page.
Now you can openthe page and edit it with some of the
work done for you. hem
into a website? It will make tables and write all the
code for you. It's great for the formative stages of web
design when you need to make a template page to get the
look down for your site. In the future I'll have a project
tutorial on making a website but for now I'l breifly describe
it. Make a new image or open one, grab the slice tool,
and then drag a box like I have in the image to the right.
You'll notice it numbered the boxes one threw three. Now
go to File/Save for web... You can chose to save your
images as Gifs, Jpgs, or Pngs. When you click save make
sure you open up the Save as type, and tell it to save
both the HTML and images, and save it to your desktop.
Photoshop then cuts up the image into three separate (or
however many parts you sliced it into), and then it creates
a webpage in HTML, makes the table and insterts the images
seamlessly so it all fits together when you open the page.
Now you can openthe page and edit it with some of the
work done for you. |
 |