| |
One
of the questions I'm most commonly asked, is how I go
about making images for chat rooms, so in this tutorial
I'll explain how I go about doing it. The basic idea is
to create a border other than the outside edge of the
image, and then as images are layered into the background,
make them both fit into, and break outside of the border
you've created. Pics that do this have a lot more depth
to them if done in this manner. Ok, on with the tutorial.
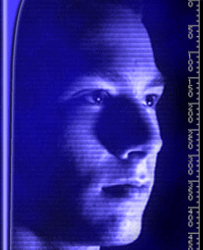
I'm
going to build this image from three photos, a photo I
took of the San Francisco skyline, a picture of myself,
and a photo I took of the moon. You can use any images
you like, but try to use a background, a person, and an
object and open all three in Photoshop, and then create
a new image say 500 pixils wide by 375 tall. For the first
step it's important that you make the background of the
page match the page that it is going to be used on. If
it's black or white that is easy to match, but you can
also open the color picker in photoshop and enter the
hexadecimal color value of the html page and enter that,
because it's important that the image be the exact same
color as the page.
The
second step is to move to your background image you've
opened, and cut it into an interesting shape. You use
 a
couple methods to do this, you can use the oval or rectangle
marquee and select a shape from the image and drag it
over, or you can create a new layer above the background,
make an oval or rectangle, and then fill it with white.
Then to this shape you can distort the shape to be skewed.
Then you can reselect the shape with the magic wand, and
move back to the background image's layer, and then copy
and paste it over to your working image. Position the
background image into your pic, hopefully now you will
have to resize this background image down some (Ctrl-T)
(Transform) will help you do this. Remember to hold down
the shift key when you drag the corners of it and this
will keep the image from distorting the perspective. If
you have to make it larger, then you probably chose an
image that was too low in resolution. As you position
your background, try to give yourself room around the
outside edge because now you'll want to apply a few effects
to the background like an outer glow or a drop shadow.
This helps to push your image off the screen. You can
apply a layer style from the layers menu under layer styles,
or from the layer styles button at the bottom of the layers
palette. Important: make sure that the glow or shadow
you apply to the background image has enough room to totally
fade out by the time it reaches the outer edge of your
image. This is something that can often go unnoticed,
until you post it on a page, and can see where the glow
is cropped off by the edge of the image, and it's very
important that the real edge of the image blends into
the webpage. Play around with the layer styles, you'll
probably want to use some type of beveling on the background
as well. a
couple methods to do this, you can use the oval or rectangle
marquee and select a shape from the image and drag it
over, or you can create a new layer above the background,
make an oval or rectangle, and then fill it with white.
Then to this shape you can distort the shape to be skewed.
Then you can reselect the shape with the magic wand, and
move back to the background image's layer, and then copy
and paste it over to your working image. Position the
background image into your pic, hopefully now you will
have to resize this background image down some (Ctrl-T)
(Transform) will help you do this. Remember to hold down
the shift key when you drag the corners of it and this
will keep the image from distorting the perspective. If
you have to make it larger, then you probably chose an
image that was too low in resolution. As you position
your background, try to give yourself room around the
outside edge because now you'll want to apply a few effects
to the background like an outer glow or a drop shadow.
This helps to push your image off the screen. You can
apply a layer style from the layers menu under layer styles,
or from the layer styles button at the bottom of the layers
palette. Important: make sure that the glow or shadow
you apply to the background image has enough room to totally
fade out by the time it reaches the outer edge of your
image. This is something that can often go unnoticed,
until you post it on a page, and can see where the glow
is cropped off by the edge of the image, and it's very
important that the real edge of the image blends into
the webpage. Play around with the layer styles, you'll
probably want to use some type of beveling on the background
as well.
Next
we will combine the other images into the pic. Drag the
other two images over into your working image if they
are the same size. If the pics are good quality and a
high resolution, I recommend cutting them out first, before
pasting them into the working image. JPG images you open
will be a single background image named "Background"
in the layers palette. Background images cannot contain
transparency, so to get around that.. double click the
layer's name and change it to anything else. If you use
the eraser on the image now... it will erase to the transparent
white and gray checker, otherwise it would erase to the
background color. To erase I always set the eraser to
paintbrush mode, you can do this in the options bar (underneath
the menubar). Important: One obstacle to cutting out an
image, is knowing exactly where your brush is at all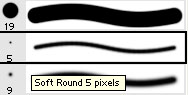 times. You can set photoshop to tell you this by going
to Edit/Preferences/Display & Cursors. I always set
brush cursors to "Brush Size" and other cursors
to precise. Now when you have the eraser brush hover over
the image you'll see the exact area outlined, though feathered
brushed will extend beyond the edge of the brush border
line. You can easily switch brushes (while you are holding
the eraser brush) by left clicking in the image, and the
brush palette will appear. Use a large solid brush to
erase the bulk of the image surrounding the person and
object images, and then for the fine work, zoom in and
use a small feathered brush to do all the edge work. Once
the images are fully cut out from their backgrounds position
and size them in the working image.
times. You can set photoshop to tell you this by going
to Edit/Preferences/Display & Cursors. I always set
brush cursors to "Brush Size" and other cursors
to precise. Now when you have the eraser brush hover over
the image you'll see the exact area outlined, though feathered
brushed will extend beyond the edge of the brush border
line. You can easily switch brushes (while you are holding
the eraser brush) by left clicking in the image, and the
brush palette will appear. Use a large solid brush to
erase the bulk of the image surrounding the person and
object images, and then for the fine work, zoom in and
use a small feathered brush to do all the edge work. Once
the images are fully cut out from their backgrounds position
and size them in the working image.
Now
you should have four layers in the working image; background
(a single color), background image, person, and an object.
Now we are going to cut the person to fit into the image.
Position it so that the top of the head and bottom come
out from the top and bottom of the background image. In
the layers palette move to the background shape image,
and use the magic wand to select the outside area, then
switch back to the layer of the person and get the rectangular
marquee, hold down alt and drag a box around the head.
Using the Alt key will subtract the area containing the
head since it comes out out of the top, we do not want
it to get deleted. Now hit the delete key, and the bottom
of the image of the person, should be cut to the same
s hape
as the image shape. hape
as the image shape.
Apply
text to the image, play with fonts and effects. For my
text I imported the file into Adobe Illustrator and created
curved text that complemented the shape of the oval, but
if I didn't have Illustrator, I could have still placed
straight text along the horizon line in the image, as
long as it ties together in some way... and as I said
before, an oval is just one shape you can choose from..
Save
the image one last time as a PSD, hopefully you've been
saving frequently... then flatten it (Layer/Flatten Image)
and resize it to a resolution the chat room will accept.
Finally, save it as a JPG file.
|
 |